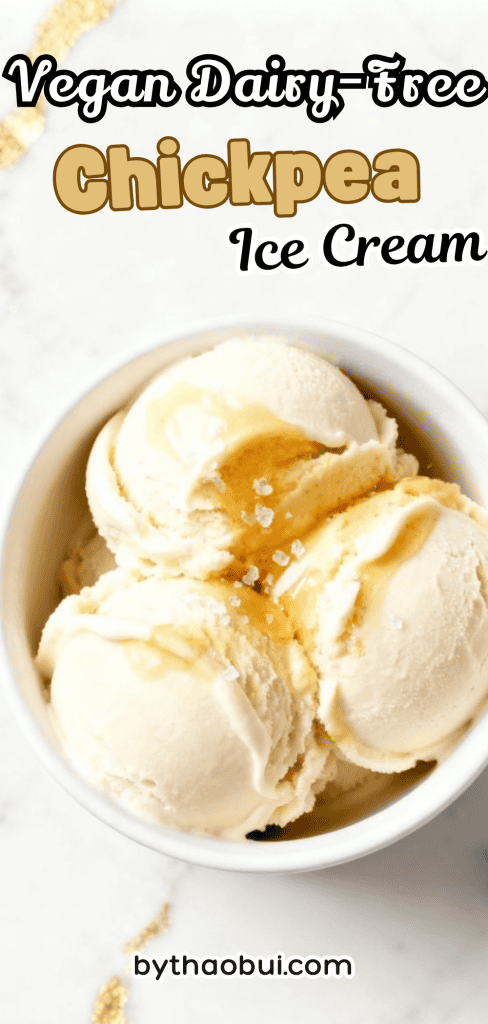
Vegan Dairy-Free Chickpea Ice Cream
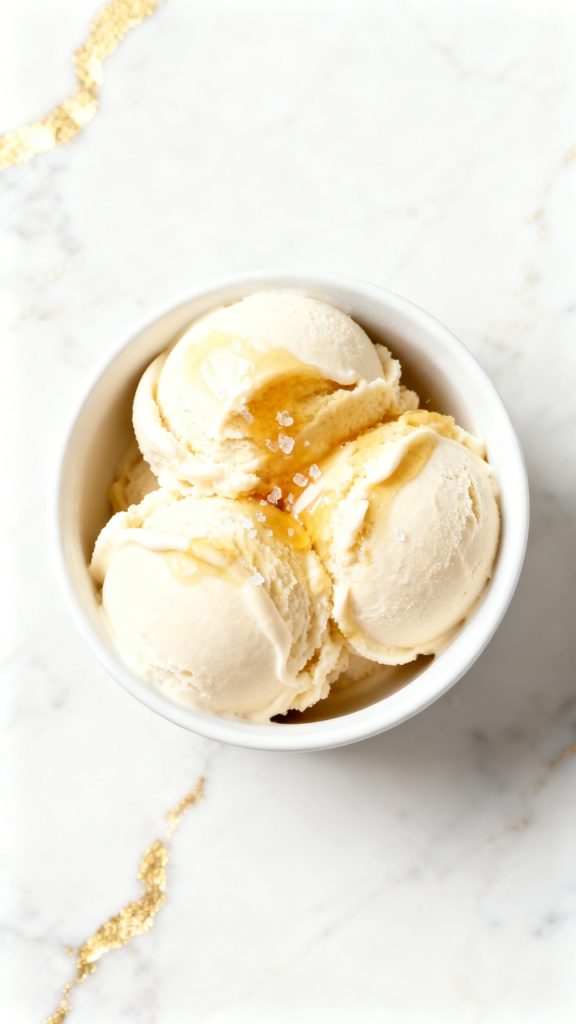
This vegan dairy-free chickpea ice cream is smooth, creamy, and way more delicious than it sounds.
The chickpeas make it extra creamy without making it taste beany, and the maple, vanilla, and coconut milk give it a soft, rich flavor.
I can’t physically test recipes in chat, but this is a carefully developed no-churn version designed to work well in a home kitchen.
Vegan Dairy-Free Chickpea Ice Cream
Servings: 8 servings
Prep time: 15 minutes
Cook time: 0 minutes
Freeze time: 6 hours
Total time: 6 hours 15 minutes
Approximate macros per serving: 190 calories, 4g protein, 18g carbs, 11g fat, 3g fiber, 9g sugar
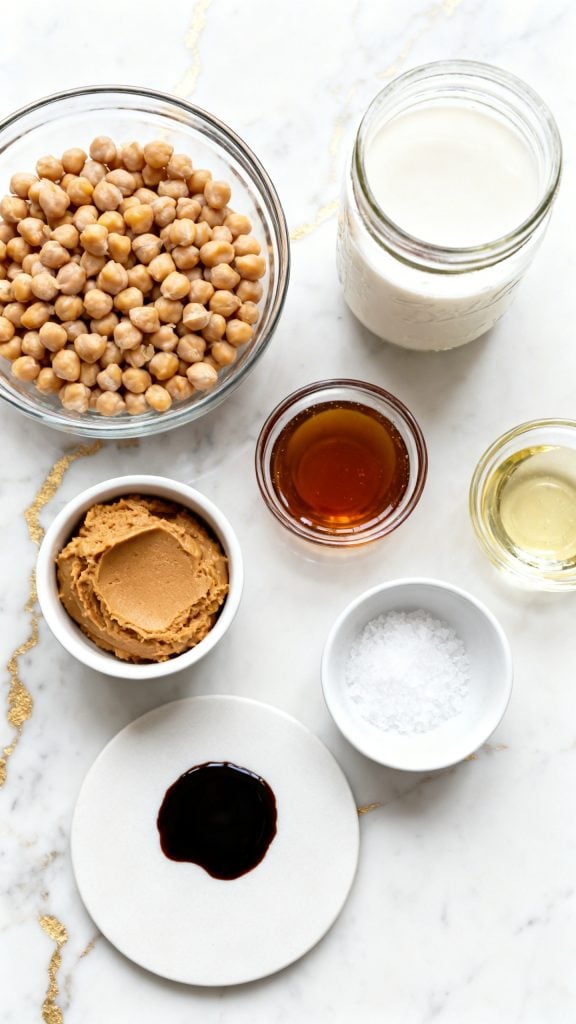
What You’ll Need
1 can (15 ounces) chickpeas, drained and rinsed very well
1 can (13.5 ounces) full-fat coconut milk
1/3 cup maple syrup
2 tablespoons almond butter
2 tablespoons refined coconut oil, melted
1 tablespoon vanilla extract
1/4 teaspoon fine sea salt
Why I Love This Recipe
The first time I made chickpea ice cream, I was mostly curious. I wanted something dairy-free that felt creamy and satisfying without needing fancy ingredients or an ice cream machine. I already had a can of chickpeas in the pantry, and I figured if they can turn into hummus, brownies, and cookie dough, maybe they could help with ice cream too. Turns out, they do an amazing job. Once blended with coconut milk, maple syrup, almond butter, and vanilla, they disappear right into the background and leave behind a smooth, rich texture that scoops beautifully after a short rest on the counter.
What I really love is how simple this recipe feels. You blend, freeze, stir a couple of times, and that is pretty much it. It is one of those recipes that feels a little surprising in the best way.
- It is dairy-free and vegan, but still creamy and rich
- It uses basic pantry ingredients
- It does not need an ice cream machine
- The chickpeas add body and a little protein
- It tastes like a mellow vanilla-maple dessert, not like beans
Recipe Instructions
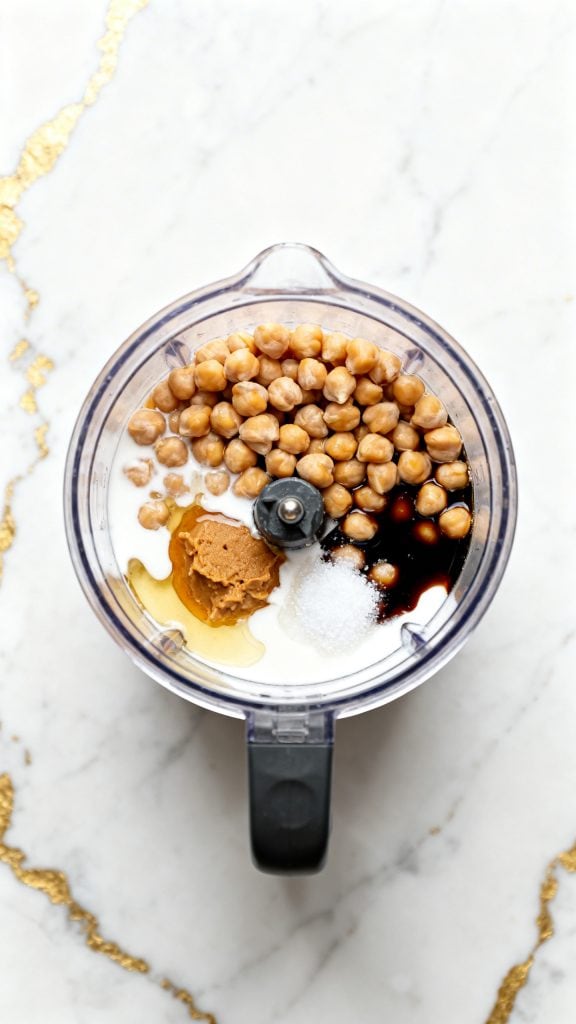
Step 1: Blend the base
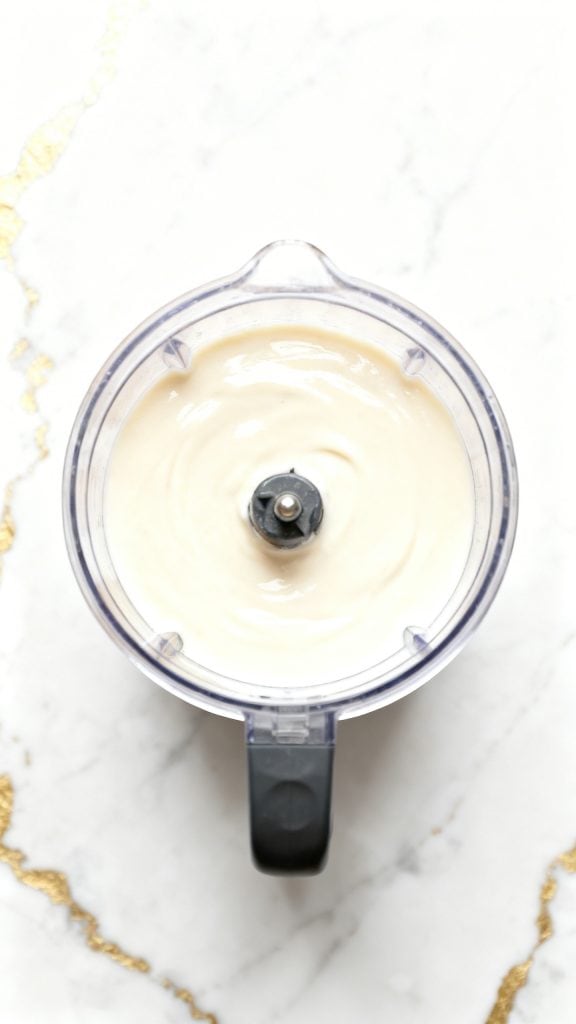
Add 1 can (15 ounces) drained and rinsed chickpeas, 1 can (13.5 ounces) full-fat coconut milk, 1/3 cup maple syrup, 2 tablespoons almond butter, 2 tablespoons melted refined coconut oil, 1 tablespoon vanilla extract, and 1/4 teaspoon fine sea salt to a blender. Blend for 60 to 90 seconds, scraping down the sides once, until the mixture looks completely smooth and creamy with no visible chickpea pieces.
Step 2: Check the texture
Open the blender and look closely at the mixture. It should be thick, glossy, and silky. Rub a tiny bit between two spoons or on the back of a spoon. If you still see grainy chickpea bits, blend for another 30 to 45 seconds until the base is extra smooth.
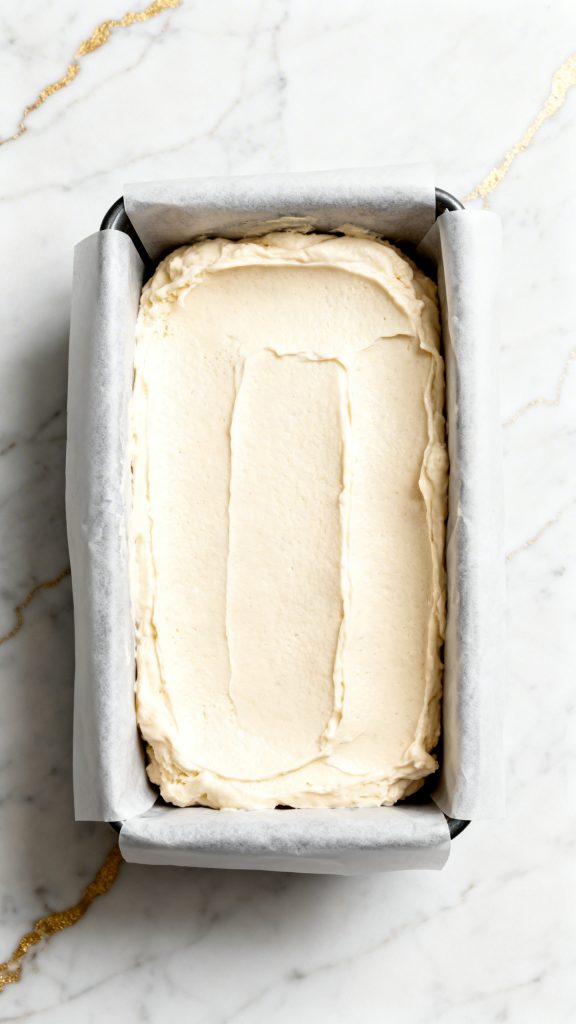
Step 3: Pour into the pan and begin freezing
Line a loaf pan with parchment paper or lightly grease it. Pour the smooth blended mixture into the loaf pan and spread it evenly with a rubber spatula. Freeze for 90 minutes, until the edges start to firm up but the center is still soft.
Step 4: Stir for a creamier texture
Take the pan out after the first 90 minutes. Stir the partially frozen mixture well with a spoon or spatula, pulling the firmer edges into the softer middle. Freeze again for 90 more minutes, then stir one more time. This breaks up ice crystals and helps the finished ice cream stay smoother.

Step 5: Freeze until scoopable
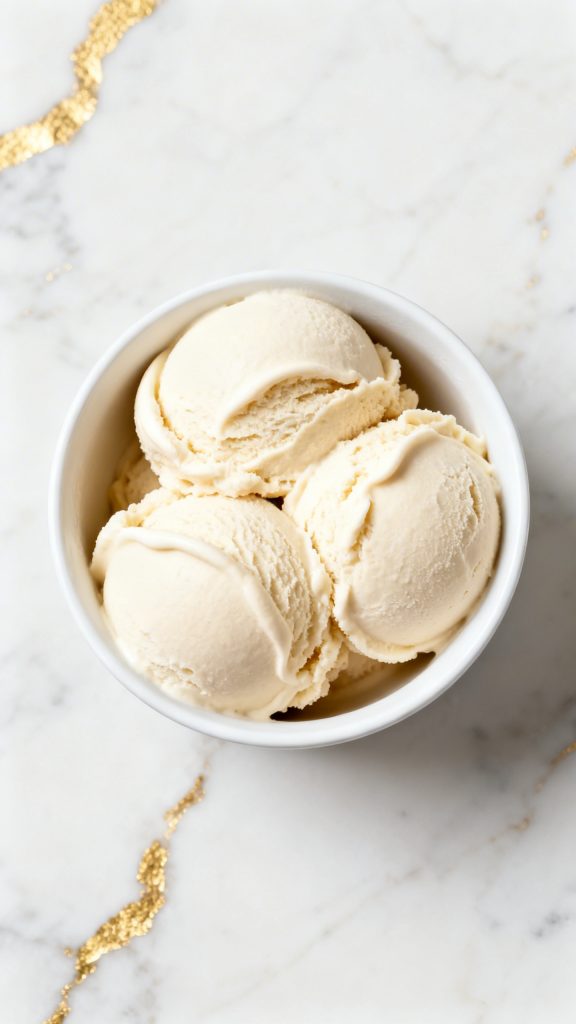
Freeze the stirred mixture for 2 to 3 more hours, or until firm. Before scooping, let the pan sit at room temperature for 10 to 15 minutes so the texture softens a little. Scoop into bowls and serve.
Why This Recipe Works (Quick Science)
Chickpeas are full of starch and fiber, and that helps give the ice cream body. When you blend them really well, they create a smooth base that holds air and moisture better than a thin liquid would.
Full-fat coconut milk brings the fat, and fat is a big part of what makes ice cream feel creamy on your tongue. Maple syrup also helps because sugar lowers the freezing point a little, so the ice cream does not freeze as hard as plain blended coconut milk would. The small amount of almond butter adds even more creaminess and helps round out the texture.
The two stir sessions during freezing help break up larger ice crystals. That is what gives this no-churn ice cream a smoother, softer scoop.
Pro Tips
Blend longer than you think you need to. The smoother the base, the creamier the ice cream will feel.
Rinse the chickpeas very well. That helps wash away extra bean flavor and gives you a cleaner, sweeter taste.
Use full-fat coconut milk, not light coconut milk. The extra fat makes a huge difference here.
Let the ice cream sit out for 10 to 15 minutes before scooping. Straight from the freezer, it will be too firm.
For the smoothest texture, flatten a piece of parchment or plastic wrap right on top of the surface before the long freeze.
Tools Required
Blender
Loaf pan
Parchment paper
Rubber spatula
Measuring cups
Measuring spoons
Can opener
Ice cream scoop
Serving bowl or round bowl
Substitutions and Variations
You can swap the almond butter for cashew butter for an even milder flavor.
You can use agave instead of maple syrup, using the same amount.
For a chocolate version, blend in 2 tablespoons cocoa powder with the base.
For a warmer flavor, add 1/2 teaspoon cinnamon.
For a cookies-and-cream style twist, fold in crushed dairy-free sandwich cookies after the second stir.
For a nuttier flavor, add 2 tablespoons tahini instead of almond butter, but expect a stronger taste.
Make Ahead Tips
You can make the base 1 day ahead and keep it in the fridge before freezing.
You can freeze the finished ice cream up to 2 weeks. Press parchment or plastic wrap right against the surface to help prevent ice crystals.
For easiest serving, scoop the ice cream into portions after it softens slightly, then refreeze the scoops on a lined tray and transfer them to a container.
Common Mistakes
Not rinsing the chickpeas enough. That can leave behind a stronger bean taste.
Using light coconut milk. The texture will turn icier and less creamy.
Skipping the stirring step. The ice cream will still freeze, but it will be firmer and more icy.
Under-blending the base. Tiny chickpea bits can make the texture feel grainy.
Trying to scoop it straight from the freezer. Letting it rest first makes a big difference.
What to Serve With
This ice cream is great with fresh berries, sliced bananas, toasted coconut, chopped dark chocolate, or a drizzle of extra maple syrup.
It also works really well with warm brownies, oatmeal cookies, apple crisp, or grilled peaches if you want to turn it into a bigger dessert.
Leftovers and Storage
Store leftovers in a freezer-safe container with the top pressed against the surface to limit ice crystals.
Keep it in the freezer for up to 2 weeks for the best texture.
Let it soften on the counter for 10 to 15 minutes before scooping again.
If it gets a little icy after a few days, let it soften slightly and stir it to bring some creaminess back.
FAQ
Does it really taste like chickpeas?
Not strongly. Once the chickpeas are blended with coconut milk, maple syrup, almond butter, and vanilla, the flavor becomes mild and creamy. Good rinsing helps a lot.
Can I make this without coconut milk?
You can try another rich dairy-free base, but full-fat coconut milk gives the best texture here. Other milks usually make it freeze harder.
Do I need an ice cream maker?
No. This is a no-churn recipe, so the freezer and a couple of stirs do the job.
Can I use homemade chickpeas?
Yes, as long as they are very soft and well-cooked. Measure about 1 1/2 cups cooked chickpeas.
Is this very sweet?
It is lightly sweet. For a sweeter ice cream, increase the maple syrup from 1/3 cup to 1/2 cup.
Can I add mix-ins?
Yes. Stir in mini dairy-free chocolate chips, crushed cookies, or chopped toasted nuts after the second freeze-and-stir step.
Final Thoughts
This is one of those fun little recipes that surprises people in the best way. It is simple, creamy, and made with ingredients that are easy to keep around. If you want a dairy-free frozen dessert without a long ingredient list or special equipment, this one is a great place to start. Make it, scoop it into a bowl, and enjoy every cold, creamy bite. Then come back and share how it turned out and any questions that popped up along the way.